이번에는 API 설계를 할 차례입니다.
프로젝트 명세서에서 API 엔드포인트를 미리 정해놨습니다. 아직 프로젝트 규모가 크지 않기 때문에 spring에서 제공하는 Srping Data Rest + Spring Data JPA를 이용하여 REST API를 손쉽게 만들어보겠습니다.
그리고 이것을 쉽게 확인할 수 있는 spring-data-rest-hal-explorer를 같이 사용하겠습니다.
먼저 보편적으로, REST API 생성 시 구조는 아래와 같을 것입니다.
(Controller -> Service -> Repository)
- Controller
@RestController
@RequiredArgsConstuctor
public class ArticleController {

    private final ArticleService articleService;

    @GetMapping
    public ArticleResponse getArticles(){
    	return articleService.getArticles();
    }
}
- Service
@Service
@RequiredArgsConstructor
public class ArticleService {

	private final ArticleRepository articleRepository;

    public ArticleResponse getArticles() {
    	List<Article> articles = articleRepository.findAll();
    }
}
- Repository
public interface ArticleRepository extends JpaRepository<Article, Long> {
}
근데 이런 과정 없이 Spring Data Rest + Spring Data JPA로 구성시에는 Controller, Service 단 구성 없이 Repository 구성만으로 REST API를 쉽게 생성할 수 있습니다.
또한, 그뿐 아니라 기존에 REST API 구성 시 필요했던 (메타데이터 제공, 페이징 및 정렬 처리, 전처리 후처리 작업등) 기능을 제공하고 있습니다.
Spring Date Rest
Spring Data Rest Respository는 Spring Data 프로젝트의 서브 프로젝트로 Repository의 설정만으로 REST API 서버를 구성해주는 신박한 기능입니다. 사용자는 Entity 클래스와 Repository 인터페이스만 작성하면 나머지 CRUD 작업은 모두 알아서 RESTful 하게 생성됩니다.
SpringData REST의 주요 기능은 Data Repository로부터 Resource를 추출하는 것으로 핵심은 Repository 인터페이스입니다. 예를 들어 OrderRepository와 같은 Repository인터페이스가 있을 경우 소문자의 복수형 resource를 뽑아내어 /orders 를 만듭니다. 그리고 /orders/{id} 하위에 각 item을 관리할 수 있는 resource를 추출해 냅니다. 이제 구현을 해보도록 하겠습니다.
build.gredle 구성
implementation 'org.springframework.boot:spring-boot-starter-data-rest'
implementation 'org.springframework.data:spring-data-rest-hal-explorer'
이렇게 의존성 주입을 해줍니다.
Repository
@RepositoryRestResource
public interface ArticleRepository extends JpaRepository<Article, Long> {
}
@RepositoryRestResource
public interface ArticleCommentRepository extends JpaRepository<ArticleComment, Long> {
}
application.yml
spring:
  data:
    rest:
      base-path: /api
      detection-strategy: annotated
여기서 spring.data.rest.base-path를 지정하여 모든 api요청의 기본 경로로 설정해줄 수 있습니다.
detection-strategy : annotated는 Repository 위에 @RepositoryRestResource 이 어노테이션을 작성한 레포지토리만
api를 제공하겠다는 의미입니다.
위의 구성으로 Article과 ArticleComment의 대한 CRUD REST API는 모두 생성되었습니다.
서버를 기동해준뒤 localhost:8080/api로 접속해줍니다.
HAL Explorer
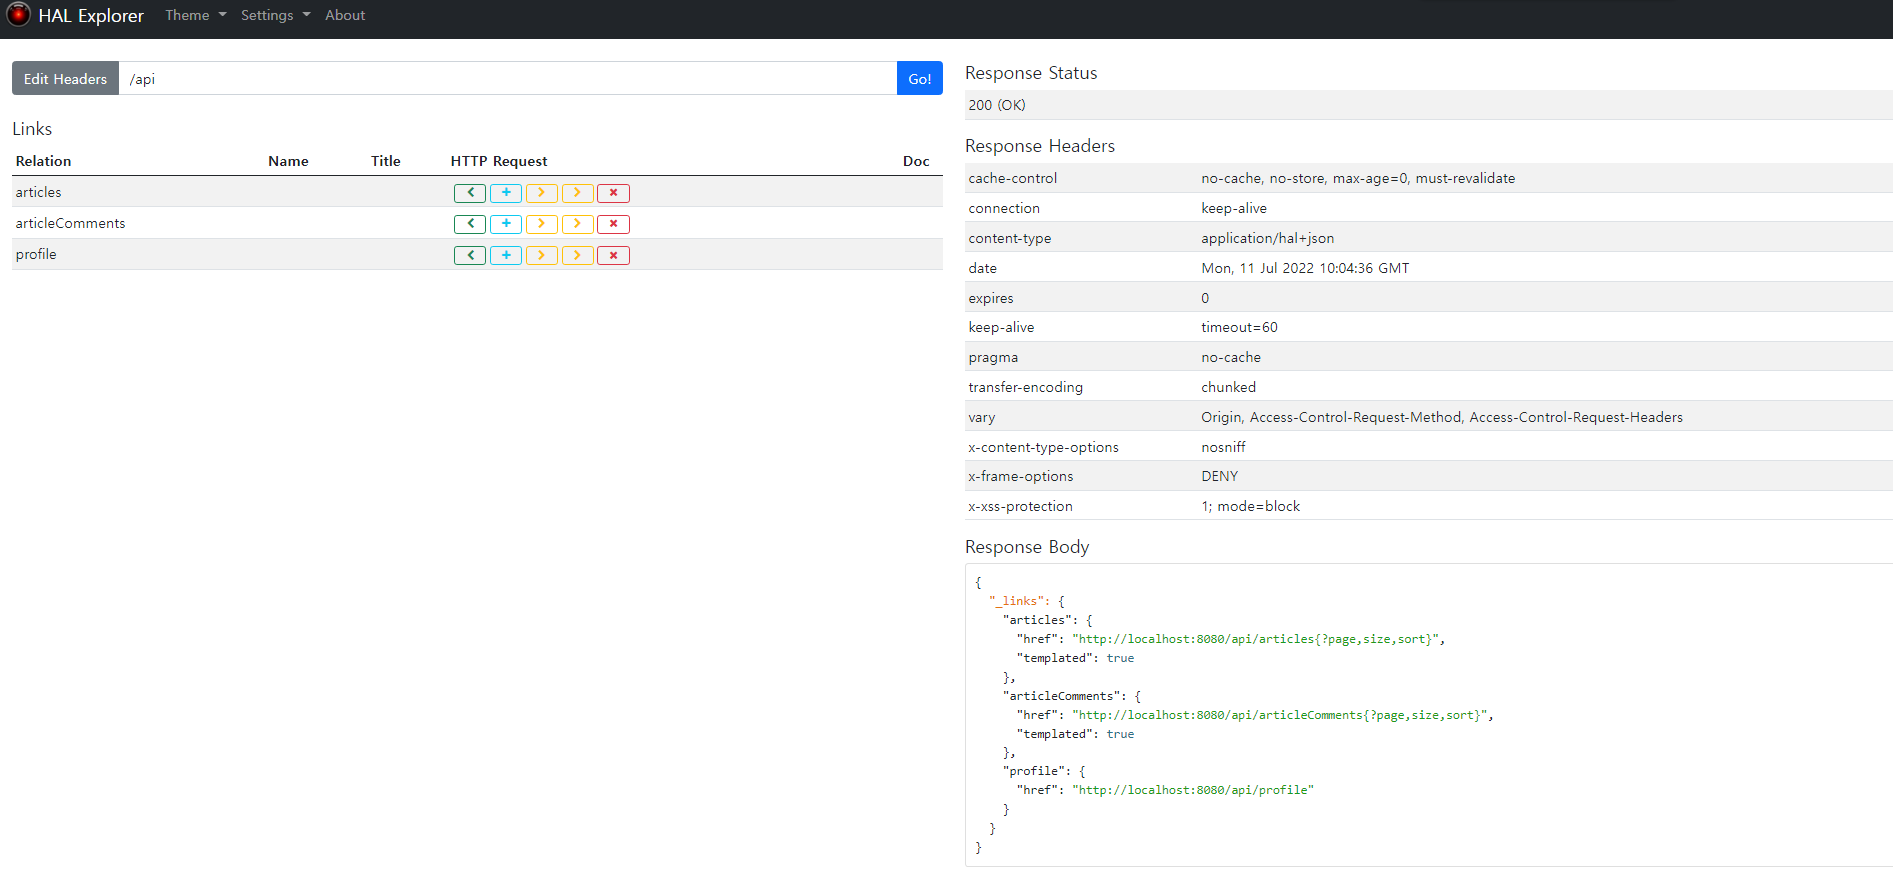
위와 같이 hal explorer가 켜집니다. 오른쪽에는 현재 생성된 REST API 이 보이고 있습니다. 이제 article을 요청해 봅시다.
article

기본적으로 20개 페이징 되어서 가져오고 헤더와 바디까지 다 표시해 줍니다.
그리고 바디의 끝부분에는 페이징에대한 정보와, REST API의 HATEOAS까지 자동으로 만들어 줍니다.

이렇게 REST API에 대해 구현을 완료했습니다.
사용 이유는 아래와 같습니다.
1. 간단한 도메인 모델을 가지는 프로젝트에 구성시 반복적인 개발 시간을 줄일 수 있는 장점이 있다고 생각합니다.
2. 기존 프로젝트에 부분적으로 적용이 가능하고 점진적으로 적용할 수 있을 것입니다.
3. Spring HATEOAS를 프런트엔드에서 사용 시 적용하면 좋을 것 같습니다.
감사합니다 :)
reference
'Project > project-board' 카테고리의 다른 글
| [Project] DTO 설계 (0) | 2022.07.14 |
|---|---|
| [Project] QueryDSL 적용 (0) | 2022.07.11 |
| [Project] 도메인 설계 및 DB 접근 로직 (0) | 2022.07.09 |
| [Project] 깃허브 이슈 정리 및 브랜치 전략 (0) | 2022.07.07 |
| [Project] 프로젝트 명세서 (0) | 2022.07.06 |

댓글